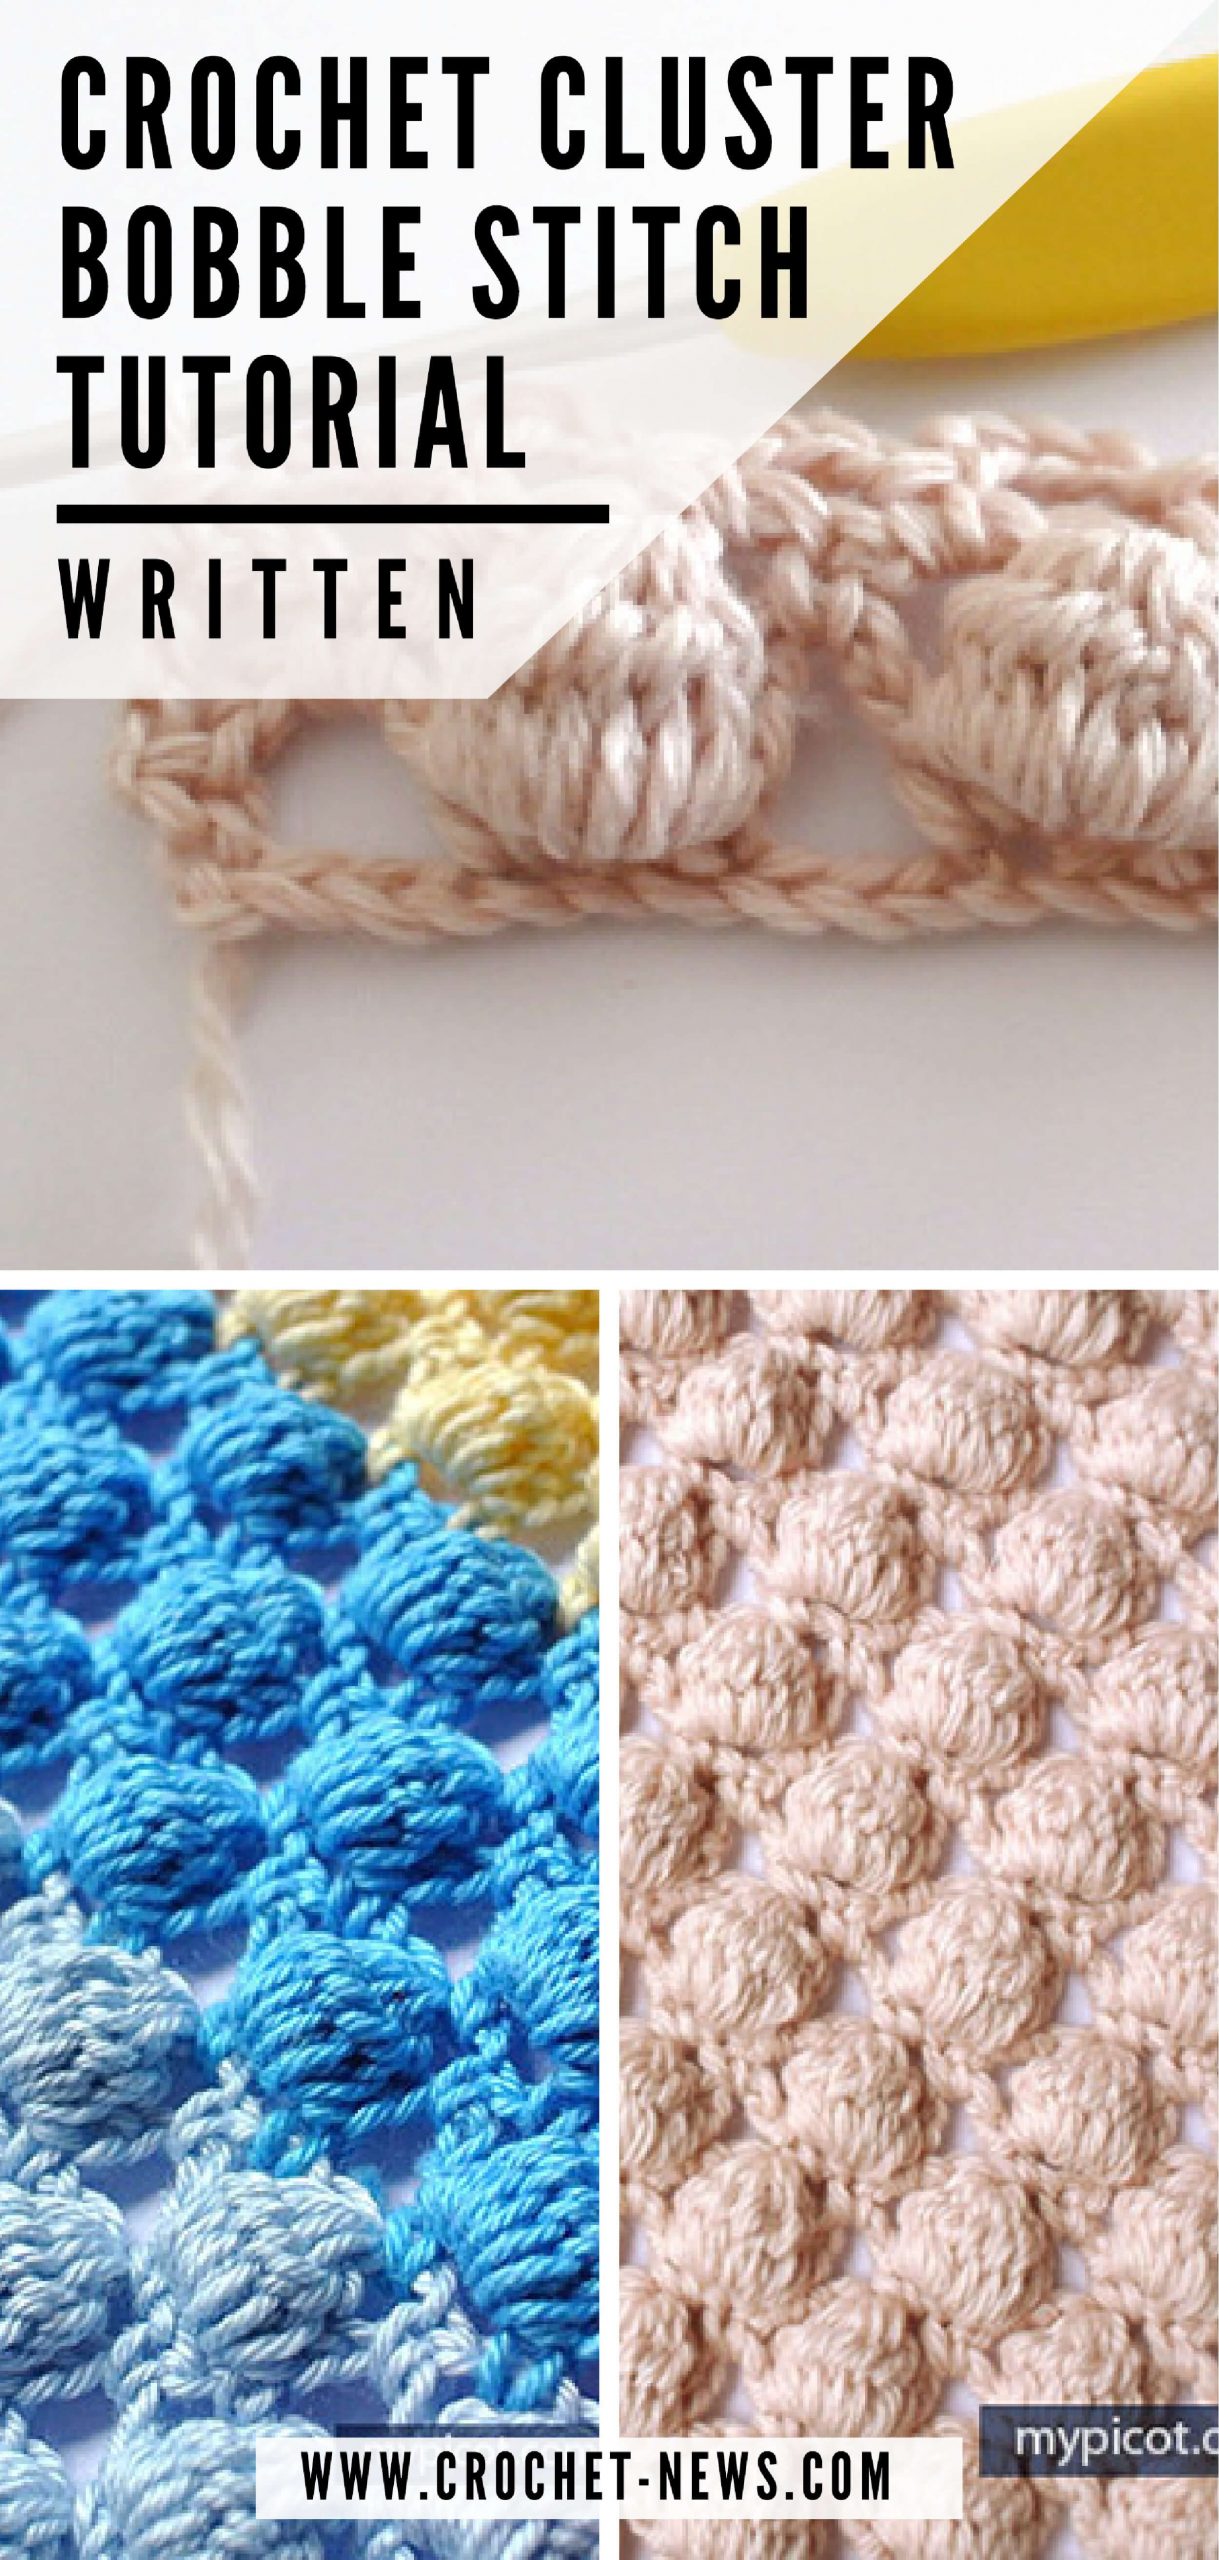
Learning a new crochet stitch can feel a bit like discovering a secret superpower for your projects, and the bobble stitch crochet, well, it's absolutely one of those! This wonderful technique gives your crocheted pieces a lovely, tactile dimension that really makes them stand out. It adds a delightful "pizzazz" to anything you make, whether you are creating a cozy blanket or a stylish accessory. There's just something so satisfying about those little bumps that pop right out of your fabric, don't you think?
You might hear it called a puff or popcorn stitch sometimes, but no matter the name, the effect is pure charm. Many people, you know, find that adding texture like this can completely change the feel of a simple piece. It is, in a way, like adding a little bit of magic to your yarn work, making it feel more special and unique. This stitch is used to create entire fabrics or decorative images such as a heart, which is pretty cool.
Actually, it's easier to learn than it sounds, so please don't let the idea of a "special" stitch make you nervous. If you are a beginner crochet enthusiast, then this easy crochet stitch will be a nice addition to your skills. We're going to go through everything you need to know, from what the bobble stitch is to how to make it, along with our best tips and some really fun pattern ideas. So, grab your hook and let's get started, shall we?
Table of Contents
- What Exactly is the Bobble Crochet Stitch?
- Why Add Bobbles to Your Crochet?
- Getting Started: Tools and Yarn
- How to Crochet the Bobble Stitch: A Step-by-Step Guide
- Making the Bobble
- Working Bobbles into a Row
- Tips for Perfect Bobbles Every Time
- Bobble Stitch Pattern Ideas to Inspire You
- Frequently Asked Questions About Bobble Stitch Crochet
- Your Next Steps in Bobble Crochet
What Exactly is the Bobble Crochet Stitch?
The bobble crochet stitch is, basically, a group of incomplete stitches worked into the same spot, then joined together at the top. This creates a raised, rounded bump on one side of your fabric. It's a fantastic way to add texture, dimension, and a touch of playful charm to any crocheted item. You can actually make them as prominent or as subtle as you like, just by changing how many incomplete stitches you work into that one spot.
As a matter of fact, you might also hear this stitch referred to as a "puff stitch" or a "popcorn stitch," as I mentioned earlier. While they all create a similar bumpy effect, there are slight differences in how they are constructed. The bobble stitch, however, tends to be a bit more defined and round, standing out more from the fabric. It's really quite distinct once you see it in person, you know?
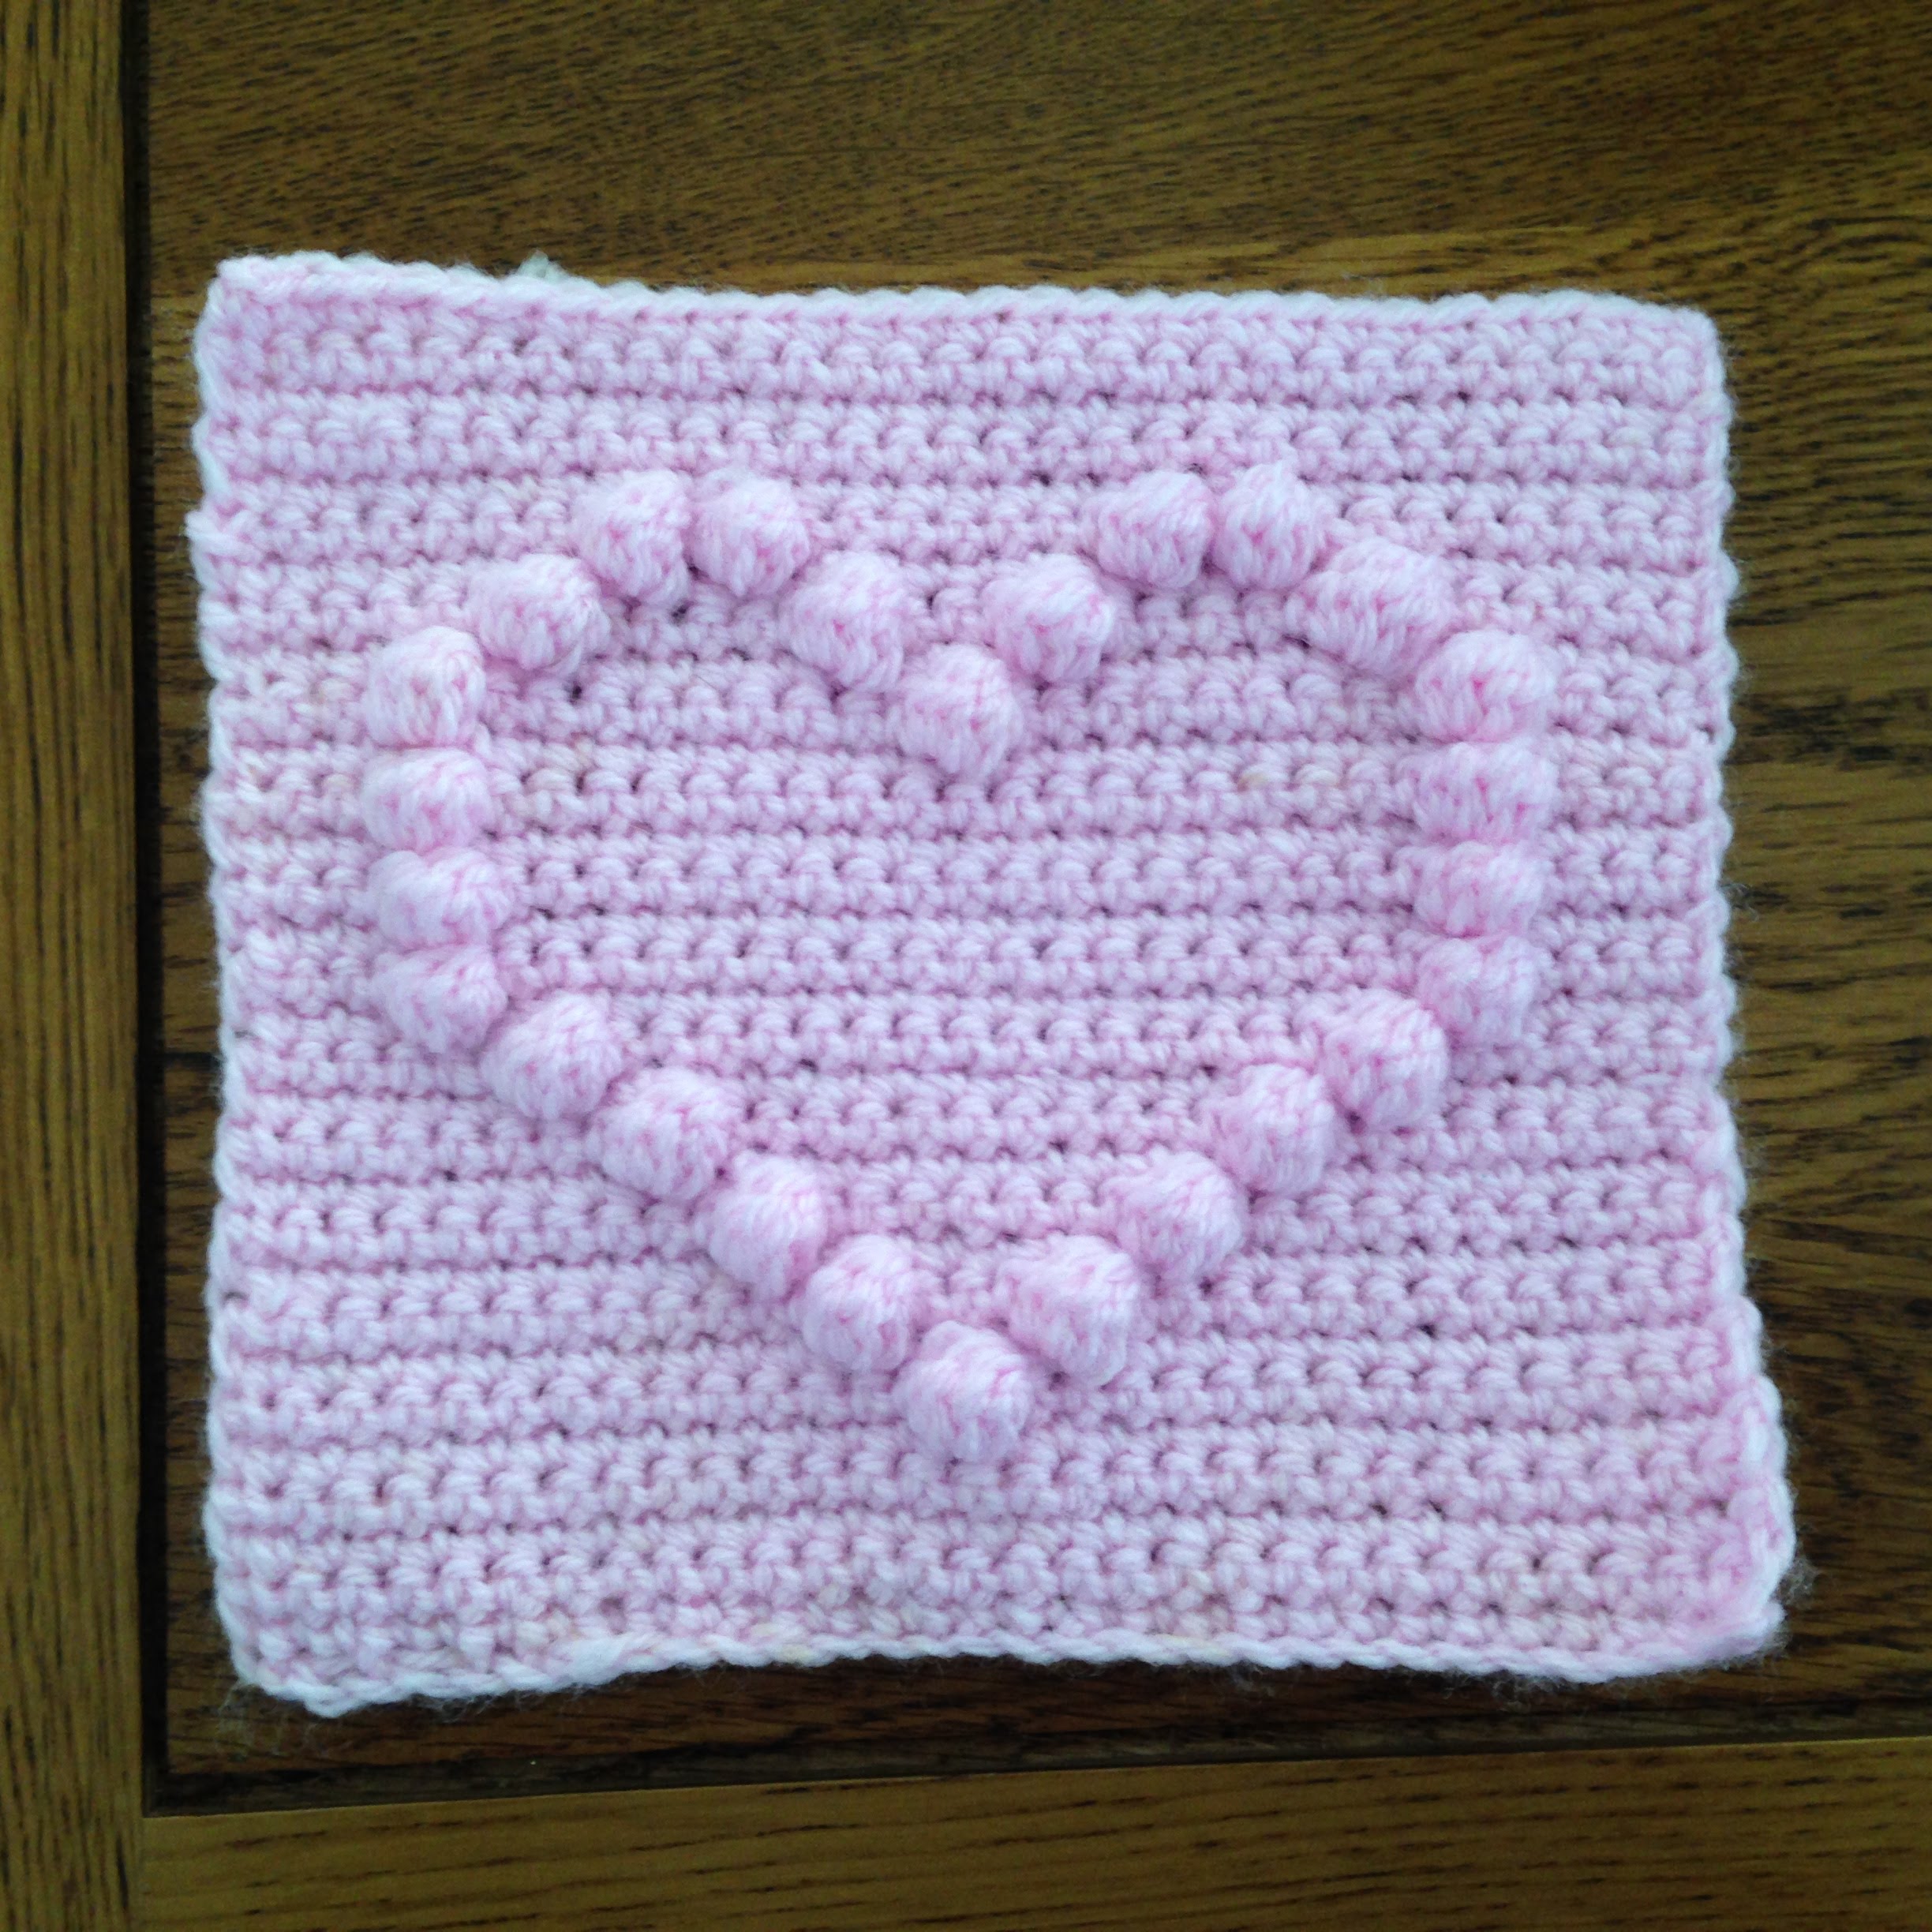
People often use bobbles to make entire fabrics that feel wonderfully bumpy and cozy, or to create decorative images like hearts, stars, or even letters within a piece. It's a very versatile stitch, you see, that adds a lot of visual interest without being overly complicated. Just imagine, a whole blanket covered in these little bumps, how lovely that would feel!
- Brooke Monk Nudes
- Charlotte Parkes Leaked
- Washington Apple Shot
- Kratos Voice Actor
- Madison Beer Boyfriend
Why Add Bobbles to Your Crochet?
Adding bobbles to your crochet projects is, honestly, a fantastic way to bring some life and personality to your work. They instantly elevate a plain fabric, giving it a rich, textured appearance that just begs to be touched. This is particularly good if you're looking to make something that feels extra cozy or has a lot of visual interest, like a baby blanket or a warm scarf. It's a bit like adding sprinkles to a cupcake, really, making it much more fun.
The bobble stitch is a great, fun crochet stitch that will add pizzazz to your next crocheted piece. It's not just about looks, though; the added texture also gives your project a bit more body and warmth. For instance, a hat made with bobbles will feel much thicker and more insulating than one made with just plain stitches. So, it's practical as well as pretty, which is always a plus.
And for those who are just starting out with crochet, learning how to crochet bobble stitch is not that hard. It's an easy crochet stitch that helps you practice working multiple stitches into one spot and closing them together. This builds a good foundation for more complex stitches later on, you know. It's a very rewarding stitch to learn, giving you a quick win and a beautiful result.
Getting Started: Tools and Yarn
Before you dive into making those lovely bobbles, you'll want to gather a few basic crochet supplies. You'll need a crochet hook, of course, and some yarn. The size of your hook will depend on the yarn you choose, and usually, the yarn label will suggest a hook size. For bobbles, you might find that using a hook that's slightly larger than what the yarn suggests can make it a bit easier to pull through all those loops, especially when you're just starting out.
When it comes to yarn, nearly any type can work for bobbles, but some will show off the texture better than others. Smoother yarns, like acrylic or cotton, tend to make the bobbles really pop and stand out clearly. Fuzzy or very textured yarns, on the other hand, might hide the definition of the bobble a little bit. It's really up to what kind of look you're going for, obviously.
Also, consider the weight of your yarn. Thicker yarns, like bulky or super bulky, will create very large, prominent bobbles that are super squishy. Finer yarns, like fingering or sport weight, will make smaller, more delicate bobbles. So, think about your project. Are you making a chunky blanket or a delicate baby item? Your yarn choice will definitely impact the final look and feel, you know, of your bobble stitch crochet.
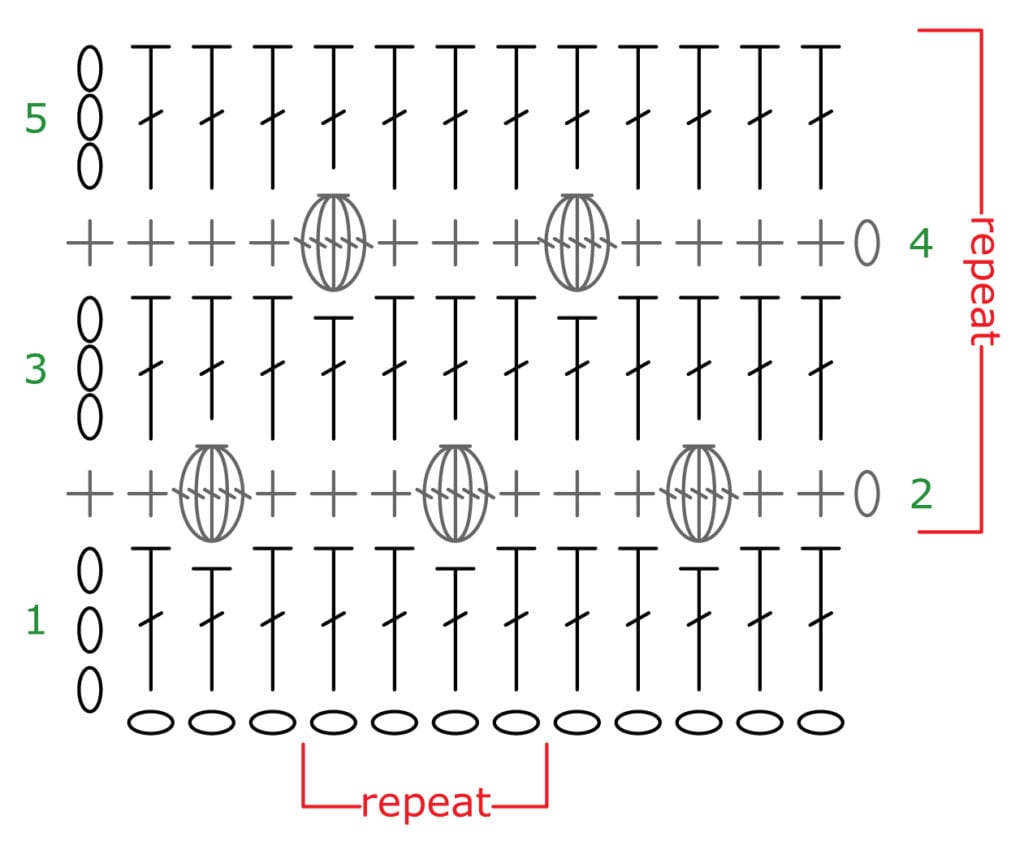
How to Crochet the Bobble Stitch: A Step-by-Step Guide
The time has come for you to learn how to do a bobble stitch! This tutorial features a detailed step by step photo and video tutorial on how to crochet a bobble, as well as a stitch pattern with bobbles arranged beautifully. While I can't show you actual photos or videos here, I can walk you through the process in clear steps. It's quite straightforward once you get the hang of it, you'll see.
Making the Bobble
To make a bobble, you'll typically start by working a series of incomplete double crochet stitches into the same stitch or space. First, you'll yarn over your hook, then insert your hook into the stitch where you want your bobble to be. Next, yarn over again and pull up a loop. You should now have three loops on your hook, which is pretty normal for a double crochet.
Now, yarn over once more and pull through the first two loops on your hook. At this point, you'll have two loops remaining on your hook. This is what we mean by an "incomplete" double crochet, because you haven't finished the stitch yet. This is the first step of making the bobble, so you're doing great, you know.
You'll repeat that entire sequence several more times, all into the *very same stitch* where you just made the first incomplete double crochet. So, you'll yarn over, insert your hook into that same spot, pull up a loop, yarn over, and pull through two loops. Each time you do this, you'll add one more loop to your hook. You'll keep doing this until you have the desired number of incomplete double crochets, which is usually four or five, depending on how puffy you want your bobble to be. For instance, a four-stitch bobble will have five loops on your hook at this stage.
Once you have all your incomplete stitches worked into that one spot, you'll have a bunch of loops sitting on your hook. This is the fun part, really, where the bobble starts to take shape. You'll then yarn over one last time and carefully pull your hook through *all* the loops that are on your hook. This action gathers all those incomplete stitches together at the top, which is what creates that lovely, raised bump.
To secure your bobble and make it really pop, you'll typically follow it with a chain 1 stitch. This chain stitch pulls the bobble forward, making it stand out more prominently on the right side of your work. It's a small step, but it makes a big difference in how defined your bobble looks. So, don't forget that little chain, you know, it's quite important.
After you've chained one, you'll then continue with your regular crochet stitches in the next stitch of your row. This could be a single crochet, a half double crochet, or whatever your pattern calls for. The bobble is now complete, and you've successfully added a lovely bit of texture to your piece! It's actually a very satisfying feeling when you see that little bump appear.
Working Bobbles into a Row
When you're working bobbles into a row, you'll usually place them on one side of your fabric, which is often the "right side" or the public-facing side. This means that if you're working in rows, you'll make the bobbles on one row, and then on the next row (the "wrong side"), you might work simple stitches like single crochet or half double crochet to help push the bobbles forward and make them stand out even more. It's a bit of a trick, you know, to get them to really pop.
The pattern you're following will tell you exactly where to place your bobbles. Sometimes they are evenly spaced, creating a uniform bumpy fabric. Other times, they are strategically placed to form specific designs, like the heart example I mentioned. You can use the exact squares Ashley does in her gorgeous crochet stitch sampler blanket, or you can alternate squares of different stitches. This gorgeous crochet stitch sampler blanket uses tons of fun stitches, including the bobble stitch, so it's a really good example of how to use them.
It's important to keep your tension consistent when working bobbles, as this helps them all look uniform. If your tension is too loose, your bobbles might look a bit floppy; if it's too tight, they might be hard to pull through. Practice really helps here, so don't worry if your first few aren't perfect. You'll get the hang of it pretty quickly, I promise.
Tips for Perfect Bobbles Every Time
Getting your bobbles to look just right can take a little practice, but there are some tips that can help you achieve that lovely, uniform texture. One thing to consider is your yarn choice. As I said before, smoother yarns tend to show off the bobble definition much better than very fuzzy ones. So, if you're aiming for really prominent bobbles, pick a yarn that doesn't have a lot of halo or fluff, you know.
Your tension is another very important factor. Try to keep your stitches consistent throughout the bobble. If you pull too tightly when drawing through those final loops, your bobble might look a bit squashed. On the other hand, if you're too loose, it might not stand out as much. It's a bit of a balancing act, really, but you'll find your rhythm.
Many crocheters find that working a single crochet stitch immediately after the bobble helps to push it forward and make it pop. This is a common technique used in patterns that feature bobbles. It creates a nice, firm base for the bobble to sit on, ensuring it protrudes beautifully from the fabric. So, always check your pattern for that next stitch, as it's quite important.
Consider the number of incomplete stitches you use to make your bobble. Most patterns call for four or five incomplete double crochets. Using more will create a larger, puffier bobble, while fewer will result in a smaller, more subtle bump. Experiment a little to see what you like best for your project. You might find that for a very dense fabric, a smaller bobble looks better, for instance.
Finally, remember that practice makes perfect. Don't get discouraged if your first few bobbles aren't exactly what you envisioned. Keep trying, and you'll soon be creating beautiful, consistent bobbles with ease. It's a very rewarding stitch to master, and it opens up a whole new world of textured crochet possibilities, which is pretty exciting, you know.
Bobble Stitch Pattern Ideas to Inspire You
Once you learn how to crochet a bobble stitch and different ways to incorporate it into your crochet patterns, a whole world of creative projects opens up! The bobble stitch is incredibly versatile, allowing you to add amazing texture to nearly any item. You can use it to create entire fabrics that feel wonderfully bumpy and cozy, or to add just a touch of interest to specific areas.
A very popular way to use bobbles is in blankets, especially baby blankets. The raised texture is just so appealing and comforting for little ones. You can make a solid bobble blanket, or you can alternate rows of bobbles with plain stitches for a more subtle effect. Imagine a soft, squishy blanket covered in these delightful bumps, it's just so inviting, you know.
Bobbles are also fantastic for creating decorative images within your crochet. As mentioned, you can use them to form shapes like hearts, stars, or even letters. This is particularly fun for personalized gifts or for adding a playful touch to items like cushions or wall hangings. It's a bit like drawing with your yarn, which is really quite clever.
Beyond blankets and decorative pieces, bobbles look amazing in accessories like hats, scarves, and bags. A bobble hat, for instance, has a wonderful chunky feel and a unique visual appeal. Similarly, a scarf with strategically placed bobbles can add a lot of style and warmth. They really do make a simple accessory feel much more special, you know.
You can also incorporate bobbles into garments like sweaters or cardigans, adding texture to sleeves, yokes, or even the main body. They work wonderfully for home decor items too, such as pillow covers, pot holders, or even rugs. The crochet bobble stitch is a fantastic way to add texture, dimension, and a touch of something truly unique to your projects. Once you learn it, check out the 22 bobble stitch patterns that are out there for more inspiration.
Frequently Asked Questions About Bobble Stitch Crochet
How many stitches are in a bobble stitch?
Typically, a bobble stitch is made by working a series of incomplete double crochet stitches into a single stitch or space. The most common number is four or five incomplete double crochets. For instance, a "4 dc bobble" means you'll yarn over, insert your hook, pull up a loop, yarn over, and pull through two loops, repeating this four times into the same spot. This leaves you with five loops on your hook before you pull through all of them to close the bobble. It really depends on the pattern, but that's a good general rule, you know.
Using more incomplete stitches will make a larger, puffier bobble, while fewer will result in a smaller, more subtle bump. Some patterns might even call for a "3 dc bobble," which would leave four loops on your hook before the final pull-through. It's always a good idea to check your specific pattern instructions, as they will tell you exactly how many incomplete stitches to work for their version of the bobble. It's a pretty flexible stitch in that way, you see.
The final chain stitch that often follows a bobble (the chain 1) is not counted as part of the bobble's stitch count itself, but it is essential for making the bobble stand out and stay secure. So, while the bobble itself is a cluster of stitches, it essentially counts as one stitch in your overall row count once it's completed and closed. This is a very important distinction when you are following a pattern, as it affects your stitch count for the row, obviously.
What is the difference between a bobble stitch and a puff stitch?
While both bobble and puff stitches create a lovely raised texture, there's a subtle but important difference in their construction. A bobble stitch, as we've discussed, is usually made with incomplete double crochet stitches that are worked into the same stitch and then closed together at the top with a single yarn over and pull-through. This tends to make the bobble sit more prominently on one side of the fabric, creating a very distinct "pop" or bump. It's almost like a little ball sitting on the surface, you know.
A puff stitch, on the other hand, is typically made by yarning over, inserting the hook, pulling up a loop, and then repeating that sequence several times into the same stitch. All these loops are then pulled through at once to close the stitch. This method often results in a stitch that is a bit more rounded and sits more evenly on both sides of the fabric, making it slightly less pronounced than a bobble. It's a bit softer, perhaps, in its appearance.
So, in essence, the bobble tends to be more defined and pushes out further, while the puff stitch is a bit squishier and more symmetrical. The choice between them really depends on the desired effect for your project. If you want a bold, sculptural texture, the bobble is probably your best bet. If you prefer a softer, more subtle fullness, then a puff stitch might be more suitable. Both are wonderful for adding dimension, though, which is really the main thing.
Is bobble stitch hard for beginners?
Absolutely not! Learning how to crochet bobble stitch is not that hard, and if you are a beginner crochet enthusiast, then this easy crochet stitch will be a nice addition to your skills. It might look a little bit intimidating at first because it involves working multiple steps into one stitch, but once you practice it a few times, it becomes very intuitive. It's really just a repetition of a basic double crochet motion, just not fully completed until the very end, you know.
Many beginners find that working a few practice bobbles on a scrap piece of yarn helps them get comfortable with the motion before adding it to a larger project. The key is to keep your tension consistent and to make sure you pull through all the loops on your hook at the very end. It's a very rewarding stitch to learn because it quickly adds a lot of visual interest to your work without requiring a lot of complex techniques. So, don't be afraid to give it a try, you might be surprised at how quickly you pick it up, which is pretty cool.
This stitch is a great way to build confidence in your crochet abilities, as it teaches you about working into specific stitches multiple times and managing multiple loops on your hook. These are skills that are very useful for many other crochet techniques down the line. Plus, the immediate satisfaction of seeing those little bobbles pop out of your fabric is a great motivator. So, yes, it's totally beginner-friendly, and you'll probably love making them, which is a big part of it.
Your Next Steps in Bobble Crochet
You've now learned quite a bit about the wonderful bobble stitch crochet! From understanding what it is to how to create those lovely bumps, you're well on your way to adding amazing texture to your projects. The best way to truly master this stitch is, honestly, to just start practicing. Grab some yarn and your hook, and make a few rows of bobbles. You'll find that with a little repetition, it becomes second nature, which is very satisfying.
Once you feel comfortable making individual bobbles, you can start exploring different ways to incorporate them into your crochet patterns. Try making a simple swatch with bobbles spaced out, or perhaps try creating a small design like a heart. The possibilities are really quite endless, and it's a lot of fun to experiment with this versatile stitch. You can find tons of free patterns online that use bobbles, so there's plenty of inspiration out there, you know.
We'd love for you to explore more about crochet stitches on our site, where you can find other fun techniques to try. Also, be sure to check out our collection of textured crochet patterns for even more ideas that feature the bobble stitch and other similar techniques. For more general crochet tips and tricks, you might also find helpful resources on sites like The Spruce Crafts, which has a lot of good information for crocheters of all levels. Happy hooking, and enjoy creating some wonderfully bumpy pieces!
Related Resources:
Detail Author:
- Name : Milford Herman V
- Username : kuphal.arno
- Email : johnson95@yahoo.com
- Birthdate : 1971-02-08
- Address : 27001 Alicia Terrace Port Orlandoton, NY 83199
- Phone : 629.877.0092
- Company : Osinski and Sons
- Job : Sheet Metal Worker
- Bio : Et non ut assumenda numquam. Architecto nam est veritatis quisquam aut inventore itaque. Sed porro fugiat sint aliquid expedita quia.
Socials
twitter:
- url : https://twitter.com/lorenmarks
- username : lorenmarks
- bio : Magni accusantium distinctio velit placeat temporibus velit laboriosam. Ipsum nobis qui non omnis molestiae sed quia. Iste debitis quas cupiditate et in quod.
- followers : 1455
- following : 665
instagram:
- url : https://instagram.com/lmarks
- username : lmarks
- bio : Commodi quam consectetur ut. Aperiam eveniet est accusamus dignissimos numquam.
- followers : 3350
- following : 541

