Are you looking to try a different way to remove hair, perhaps something a bit gentler and more natural? Well, you know, sugaring has really taken off, especially with trends on platforms like TikTok. It's a method that's been around for centuries, actually, used by women in ancient Egypt and Greece, so it's not a new trick at all. This popular hair removal approach uses a simple, warm paste, and it's something you can totally make right in your own kitchen.
For many, the thought of traditional waxing can bring up feelings of discomfort or, you know, just a general dislike for harsh chemicals. Sugaring, on the other hand, tends to be a bit kinder to your skin. It’s an appealing choice if you want to save some money on salon visits or just prefer a more natural way to get smooth skin. This guide is here to help you understand everything about making your own DIY sugar wax.
We've gathered all the things you need to know about how to make DIY sugar wax at home, with advice from dermatologists and estheticians. You'll learn the recipe, how to use it, and some tips for getting a truly smooth finish. Making sugar wax at home is, in a way, a great way to keep your skin feeling soft and looking good without a lot of fuss. It's really just three simple ingredients and a straightforward process, so you can pretty much avoid those harsher products.
Table of Contents
- Why Choose Sugar Wax?
- The Simple Sugar Wax Recipe
- Getting the Perfect Consistency
- How to Use Your Homemade Sugar Wax
- Aftercare for Super Smooth Skin
- Troubleshooting Common Sugar Wax Issues
- Frequently Asked Questions
- Final Thoughts on DIY Sugaring
Why Choose Sugar Wax?
Sugaring, you know, is a really interesting alternative to traditional waxing methods. It's often called a gentler way to remove hair, which is a big plus for many people. Unlike some other options, sugar wax sticks only to the hair and dead skin cells, not to your live skin. This can mean less irritation and, quite frankly, a more comfortable experience overall.
Another great thing about sugaring is that it's made from natural ingredients. We're talking about sugar, water, and lemon juice – that's pretty much it. You probably have these things in your kitchen pantry today, so it’s simple to make a DIY sugar wax straight away. This means you're avoiding a lot of the chemicals found in commercial waxing products, which can be a relief if you have sensitive skin or just prefer a more natural approach to beauty.
Plus, making your own sugar wax at home can save you a good bit of money. Salon waxing appointments, as you know, can really add up over time. By taking the DIY route, you're cutting down on those costs significantly. It’s an excellent way to maintain smooth skin naturally, and you can get soft, smooth skin for weeks at a time, which is pretty nice.
The Simple Sugar Wax Recipe
So, you're looking for a homemade wax recipe to try the sugaring hair removal method? You've definitely come to the right place. Making sugar wax at home is incredibly easy, and you really only need a few things you likely already have. This popular sugaring paste recipe is as simple as mixing together some sugar, water, and lemon juice. It's honestly that straightforward.
Ingredients You'll Need
To create your safe and effective DIY sugaring wax, you'll need just three main ingredients. These are, you know, super common kitchen staples, so getting started is pretty simple.
- Sugar: About two cups of granulated cane sugar works best. This is the main base for your wax.
- Water: Roughly a quarter cup of filtered water. This helps dissolve the sugar and create the right consistency.
- Lemon Juice: Roughly a quarter cup of fresh lemon juice. The acidity here is actually pretty important; it helps break down the sugar and keeps the wax from crystallizing. Some people, by the way, use apple cider vinegar instead of lemon juice, and that can work too.
Step-by-Step Instructions
Making sugar wax at home is, you know, a very straightforward process. Just follow these steps carefully to get the best results for your DIY sugar wax.
- Combine Ingredients: Get a medium-sized saucepan and put your two cups of sugar, a quarter cup of filtered water, and a quarter cup of lemon juice into it. Give it a good stir to mix everything together.
- Heat Gently: Place the saucepan over medium heat. You want to bring the mixture to a boil, but do it slowly. Keep stirring constantly to make sure the sugar dissolves completely and doesn't stick to the bottom of the pan.
- Boil and Simmer: Once it starts boiling, reduce the heat to low. Let it simmer gently. This is where the magic happens, so to speak. You'll need to keep an eye on it, as it can go from perfect to burnt pretty quickly.
- Watch for Color Change: The mixture will start to change color. It will go from clear to a light golden, then to a deeper amber color. This is probably the most important part, you know, for getting it just right. It should look like honey or a dark apple juice. This usually takes about 7-10 minutes, but it really depends on your stove and how much heat you're using.
- Test Consistency: To check if it’s ready, drop a small amount of the hot mixture into a glass of cold water. If it forms a soft, pliable ball that you can roll between your fingers, it’s done. If it dissolves, it needs more cooking. If it’s too hard, you’ve probably cooked it too long.
- Cool Down: Once it reaches the right consistency, take the saucepan off the heat immediately. Pour the hot sugar wax into a heat-safe glass container. Let it cool down completely, or at least until it’s warm enough to handle comfortably but not too hot for your skin. It should be warm, like bathwater, and have a thick, honey-like texture.
Getting the Perfect Consistency
Achieving the right consistency for your sugar wax is, you know, arguably the trickiest part, but it's totally doable with a little practice. The goal is a thick, honey-like texture that's pliable but not too sticky or too hard. If it's too runny, it won't grab the hair properly. If it's too stiff, it'll be hard to spread and might even crack.
When you're cooking it, watching the color is key. You want that lovely amber, like a dark honey or a very light caramel. If it gets too dark, it's likely overcooked and will be too brittle. If it's still too light, it might be too soft and not effective. The cold water test, as I was saying, is your best friend here. It really tells you if you've got it just right for hair removal.
Sometimes, even after following the recipe, you might find it’s a bit off. Don't worry, that's pretty normal for a first-timer. If it's too thick after cooling, you can gently reheat it with a tiny bit of water to loosen it up. If it's too thin, you might need to cook it a little longer next time, or try adding a tiny bit more sugar if you’re brave, but cooking longer is usually the answer.
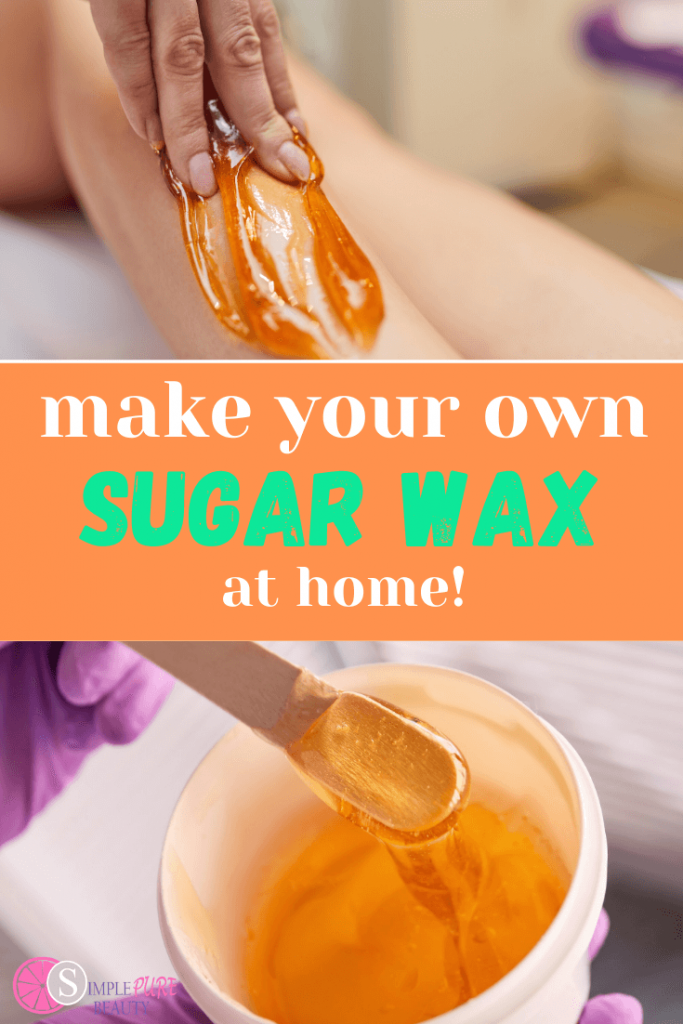
How to Use Your Homemade Sugar Wax
Once your sugar wax has cooled to a comfortable temperature, it's time to put it to use. This DIY sugar wax recipe is simple and safe to use on most areas, including, you know, the bikini line. Using it properly is just as important as making it correctly for smooth results.
Skin Preparation
Proper skin preparation is, you know, pretty essential for a good sugaring experience. You want your skin to be clean and dry. Any oils or lotions on your skin can actually prevent the sugar wax from sticking properly to the hair, which, you know, defeats the purpose.
- Cleanse: Start by washing the area you plan to sugar with soap and water. This helps remove any dirt, oils, or residue.
- Dry Thoroughly: Make sure your skin is completely dry. You can pat it dry with a clean towel.
- Powder (Optional but Recommended): For an even better grip, you can dust a very thin layer of cornstarch or baby powder over the area. This helps absorb any lingering moisture and creates a barrier, making the process a bit smoother.
Applying the Wax
Applying the sugar wax correctly is, you know, really important for effective hair removal. The goal is to get a good grip on the hairs without irritating your skin too much.
- Test Temperature: Always test a small amount of the wax on your wrist first to make sure it’s not too hot. It should be warm and pliable, but never scalding.
- Scoop and Roll: Take a small ball of the sugar wax, about the size of a golf ball, with your fingers. You can also use a wooden applicator stick if you prefer. Roll it around in your fingers a bit to make it more pliable.
- Apply Against Hair Growth: This is a key difference from traditional waxing. Apply the sugar wax to your skin against the direction of your hair growth. Press down firmly, spreading a thin, even layer. You want to make sure it really adheres to the hairs.
- Work in Small Sections: It's usually best to work on smaller areas at a time, especially when you're just starting out. This gives you more control and makes the process, you know, a bit less overwhelming.
Removing the Wax
The removal technique for sugaring is, you know, also a bit different from traditional waxing, and getting it right can make a big difference in how effective and comfortable it is.
- Flick and Pull: With one hand, hold your skin taut, really pulling it tight. With the other hand, grab the edge of the sugar wax. Then, in one quick, swift motion, flick or pull the wax off *in the direction of your hair growth*. This is the opposite of traditional waxing and helps prevent breakage and ingrown hairs.
- Stay Parallel: Try to keep your hand or the wax strip parallel to your skin as you pull, not pulling upwards. This helps reduce discomfort and ensures a cleaner removal.
- Re-use the Ball: You can actually reuse the same ball of sugar wax several times until it loses its stickiness or becomes too saturated with hair. This is pretty cool, as it means less waste.
- Clean Up: Any sticky residue left on your skin can be easily rinsed off with warm water. Since sugar wax is water-soluble, it’s super easy to clean up, which is, you know, a definite perk.
Aftercare for Super Smooth Skin
Once you’ve finished sugaring, a little aftercare can go a long way in keeping your skin feeling great and looking smooth. This helps prevent any irritation and ensures your results last, you know, as long as possible.
After you’ve rinsed off any leftover sugar, it’s a good idea to apply a soothing lotion or gel. Something like aloe vera gel or a gentle, unscented moisturizer can really help calm your skin down. Avoid anything with heavy fragrances or harsh chemicals right after sugaring, as your skin might be a bit sensitive.
For the next 24-48 hours, try to avoid really hot showers, tight clothing, and intense exercise that might cause a lot of sweating. These things can sometimes irritate freshly sugared skin. Also, you know, try to stay out of direct sunlight or tanning beds for a day or two, just to be safe.
To prevent ingrown hairs, which can be a bit of a nuisance, consider gently exfoliating the sugared areas a few days after your session. You can use a soft brush or a mild scrub. This helps keep the hair follicles clear, allowing new hairs to grow out properly. Remember, consistency with aftercare can really make a difference in maintaining that lovely smooth skin.
Troubleshooting Common Sugar Wax Issues
Even with the best sugar wax recipe, you might run into a few snags, especially when you're just getting started. Don't worry, these are pretty common, and there are usually simple fixes. It's all part of the learning process, you know.
- Wax is Too Sticky/Won't Pull Hair: If your wax is too soft or sticky, it probably means it wasn't cooked long enough. You can, you know, gently reheat it on low heat and cook it for a few more minutes until it reaches that amber color and passes the cold water test.
- Wax is Too Hard/Cracks: If your wax becomes too brittle or hard to work with, it means it was cooked for too long. For the batch you have, you can try adding a tiny bit of hot water (like a teaspoon at a time) and gently reheating it to soften it up. For your next batch, just reduce the cooking time slightly.
- Not Removing Hair Effectively: This could be due to a few things. Maybe your wax consistency isn't quite right (too soft or too hard). It could also be that your skin wasn't clean and dry enough, or you didn't apply enough pressure when spreading the wax. Make sure you're applying against the hair growth and pulling with a quick flick in the direction of growth.
- Wax Sticks to Skin: If the wax is just sticking and not coming off cleanly, it might be too soft, or your skin might not have been dry enough. Try applying a little more powder to the area, or let the wax cool down a bit more if it's too warm.
It's honestly a bit of trial and error at first, but once you get the hang of it, making and using your own sugar wax becomes, you know, pretty second nature. Just keep practicing, and you'll get that perfect consistency and technique down in no time.
Frequently Asked Questions
Is sugar waxing really less painful than regular waxing?
Many people find sugar waxing to be, you know, noticeably less painful than traditional waxing, and it often works just as well. This is largely because sugar wax only sticks to the hair and dead skin cells, not to your live skin. Traditional wax, on the other hand, can adhere to live skin, which is why it often feels more intense. Plus, with sugaring, you pull the hair in the direction of its growth, which can reduce breakage and discomfort, so it's a bit gentler on your body.
What ingredients do you need for a homemade sugar wax?
You really only need three simple ingredients to make sugar wax at home, and you probably have them in your kitchen right now. It's basically just sugar, water, and lemon juice. Some people, you know, might use apple cider vinegar instead of lemon juice, but the principle is the same. These few items mix together to create a safe and effective DIY sugaring wax, which is pretty convenient.
How long does sugaring last, and how do you get a smooth finish?
Sugaring can give you soft, smooth skin for weeks at a time, often comparable to traditional waxing results. To get that really smooth finish, there are a few things to keep in mind. First, make sure your sugar wax has the right consistency – not too sticky, not too hard. Second, prepare your skin properly by making sure it’s clean and completely dry, maybe even using a little powder. And third, the technique for applying against hair growth and pulling in the direction of hair growth is, you know, super important for effective removal and a clean result. Aftercare with soothing lotions and gentle exfoliation a few days later also helps maintain that smoothness.
Final Thoughts on DIY Sugaring
Trying sugaring at home is, you know, a pretty rewarding experience. It's a method that's stood the test of time, offering a gentler, more natural way to achieve smooth skin. With just three simple ingredients and a bit of practice, you can really master this ancient beauty secret. It's a great way to save money on hair removal by taking the DIY route, and it gives you control over what goes on your skin.
Whether you want to hop on the sugaring trend from TikTok or just want to save money on waxing, we’ve got you covered. This DIY sugar wax recipe is simple and safe to use on most areas, including the bikini line. You can make sugar wax with those few simple ingredients, and it's so easy to learn how to make sugar wax at home. Remember, getting it perfect might take a try or two, but the benefits of natural, smooth skin are, you know, definitely worth it.
Ready to give it a go and get started on your journey to naturally smooth skin? Learn more about natural beauty solutions on our site, and for more specific tips on hair removal techniques, you can find additional information here. Happy sugaring!
For further reading on the history and benefits of sugaring, you might find this article on Wikipedia helpful, which, you know, provides a good overview of the practice.
Related Resources:


Detail Author:
- Name : Gilda Goodwin MD
- Username : aletha.grant
- Email : beth.feeney@gmail.com
- Birthdate : 1998-06-23
- Address : 6405 Halvorson Harbors West Minnie, NH 68566-8099
- Phone : 352-877-7025
- Company : Bartoletti, Frami and Kiehn
- Job : Education Administrator
- Bio : Omnis ea necessitatibus aut culpa sint est. Tenetur et et recusandae autem. Consequatur ut harum aut et quidem. Aut ipsam delectus ut at praesentium quod.
Socials
linkedin:
- url : https://linkedin.com/in/shermankuphal
- username : shermankuphal
- bio : Esse tenetur inventore quidem.
- followers : 2986
- following : 1072
tiktok:
- url : https://tiktok.com/@shermankuphal
- username : shermankuphal
- bio : Sunt assumenda culpa quis. Laborum culpa ipsa ea ut.
- followers : 3772
- following : 50
